The Layers Panel.
The Layers Panel contains all of the Layers in your painting, and lets you edit their properties.
At the top of the panel is a green grip that can be used to drag it around and position it where you want. There is also a close button that closes the panel, and a menu button that gives options for positioning it and general layer operations.
To open the Layers Panel, click the Layers button on the Canvas Panel which sits on the bottom edge of the ArtRage window, the button with the stack of paper icon. This button will also close the panel if it is open. You can also press the L key to open the panel.
The order in which the Layer Previews appear indicates how they are stacked in the canvas. The bottommost Layer in the Panel is the background, and each item on top of it is placed in that order one on top of the other, so the topmost item in the Panel is the topmost visible sheet in your canvas.
The Thumbnail.
For every Layer you have, the panel shows a single preview with 3 buttons attached. If the Layer is the currently selected one, the preview will sit on a green background. Otherwise, the background will be grey. To select a layer, click on its thumbnail.
The top button sets whether the Layer is visible. If a Layer is hidden, it is not displayed in the Canvas. If you want to paint on a layer beneath the top one you may find this useful, hiding paint that would get in the way of your work.
The middle button is used to set how transparent the Layer is. This setting changes the transparency of the Paper the Layer is made from and all the Paint on it. If you wish to fade your Paint, click this button and edit the value in the dial that pops up.
The lower button opens a menu containing options for the current layer. These options are:
Moving Layers.
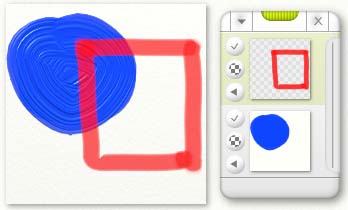
You can move layers up and down in the stack on your painting. Layers go behind all paint that is on Layers above them in the panel. For example, in this image, the blue blob is in front of the red square.
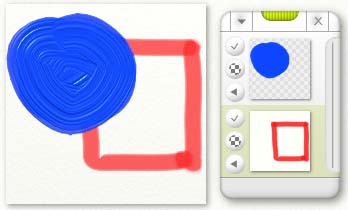
If I want to move the red square so that it is on top of the blue blob, I click and drag the red square Layer preview in the Layer panel. I drag it up and drop it when the arrow that appears indicates it will be put on top of the blob. Of course, when I put it on top, it hides the blue blob because the red square’s Layer has been told that it’s made of paper.
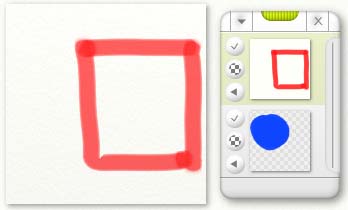
As we’re about to see, I can change that by telling the Red Square Layer to be made of transparent paper, and the Blue Blob Layer to be made of normal paper.