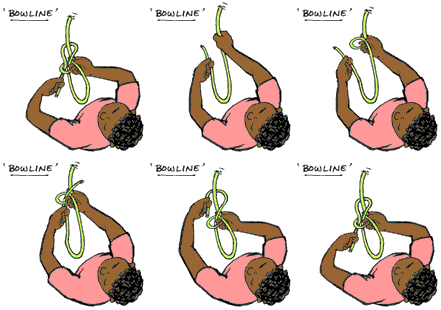
The Bowline
![]()
![]()
An important sailor's knot
Sometimes you need to make a loop at the end of a rope that'll stay a loop. The bowline (pronounced BO - lin) is a critical knot used to make a loop that's secure and will stay open for as long as you need it.
Step 1: Hold it
Hold the working end (the longer end)
of a rope in your nondominant hand. The working end should trail up
and away from you.
Step 2: Loop
it
Make a loop by passing the free end over the working end. For
purposes that'll soon be clear, call this loop "the hole." Hold the
hole with your nondominant hand at the point where the two ends cross
over.

Note: When you make this loop, it's critical that the free end pass on top of the working end. It's also a good idea to make it relatively small, because in the bowline there's a second, larger loop that should be easy to distinguish.
Step 3: Thread
it
Move the free end under the hole, and pass the free end up through
the hole. (Leave enough rope hanging down on this free end. Later,
it'll form the second, larger loop.)
Step 4: Wrap it
Pass the free end over the working
end, then around behind it, and then back down the hole again. Be
sure you pass the free end through the small loop of the knot and not
the second, larger loop you're creating.
Step 5: Tighten
it
Hold the free end and the side of the larger loop together in one
hand. Hold the working end in your other hand. Pull gently on the
working end until the knot is snug. Then grab the loop with one hand,
the working end with the other, and pull tight.
Step 6: Remember
it!
Here's a clever way to remember the bowline: imagine a country scene.
The free end is a rabbit; the working end is a tree with a rabbit
hole at the bottom of it.
Say to your self, "The rabbit comes out of the hole, goes around the tree and back down the hole again.".