|
Softwood cuttings are taken
from plants during spring till summer, while the plants are
actively growing.They are called softwood cuttings if they
come from relatively soft, flexible new growth, and they are
the easiest stem cuttings to take, and the fastest to grow
roots. Many perennials, shrubs, and trees can be propagated
by softwood cuttings, including coleus, forsythia, geranium
(Pelargonium), and others.
Semihardwood cuttings are taken somewhat later in the
growing season, usually in summer or early autumn. A
semihardwood stem is firm enough to snap if bent sharply; if
it just bends, it's too mature for satisfactory rooting.
These cuttings take longer to grow roots.
The procedure for rooting these two types of stem
cuttings is the same.

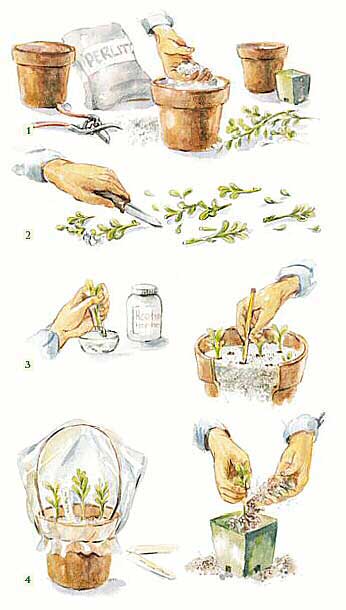
Rooting softwood
and semihardwood cuttings.
1. Prepare the containers first. Use clean pots with
drainage holes. Fill them with a half-and-half mixture of
potting mixture and pumice sand. Dampen the mixture.
2. Gather cuttings early in the day, when plants are
fresh and full of moisture. The parent plant should be
healthy and growing vigorously. With a sharp knife or
secateurs, cut off an 20 to 30cm length of stem.
3. Prepare the cuttings by removing and discarding any
flower buds, flowers, and side shoots.
4. Then slice the stem into 5 to 10cm pieces, each with
at least two nodes (growing points). Make each cut just
below a node, since new roots will form at this point.
5. Strip the lower leaves from each cutting.

6. Dip the cut end in rooting hormone powder, if desired.
(Many kinds of plants will root without the use of
hormones.) Tap off excess powder.
7. Using the end of a sharp pencil, make holes in the
rooting medium two cm apart; then insert the cuttings.
8. Firm the medium around the cuttings and water with a
fine spray.
9. Label each container with the name of the plant and
the date. Set containers in a warm spot that's shaded but
not dark.
10. Enclose each container in a plastic bag, fastening
the bag closed to maintain humidity. Open the bag for a few
minutes every day to provide ventilation.
11. Once the cuttings have taken hold and are growing
roots, they will begin to send out new leaves. To test for
rooting, gently pull on a cutting; if you feel resistance,
roots are forming.
12. At this point, expose the cuttings to drier air by
opening the bags; if the cuttings wilt, close the bags again
for a few days.
13. When the plants seem able to cope with the open air,
transplant each one to its own pot of lightweight potting
soil.
14. By the next planting season, the new plants should be
ready to go out in the garden.

Back to Top
|