
|
|
"SOUND PLANE! REACHES SPEEDS OF MACH 3." -- WILL "Off of our 3rd floor balcony. Went forever! Thanks." -- zachary & spencer "WHOA!! this was the first paper airplane that actually worked for this aerodynamically challenged gal!" -- Anne "I like your plane a lot! It is the best pattern my
mom and I found on the internet and it flew the best! Thank
you" -- Carter(4) and Mom "The Sabertooth RULES" -- Otiluke "perfect to throw at my teacher" -- Ty |
|
|
|
||
|
|
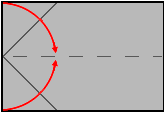
1. Start with a 8.5" x 11" sheet of photocopy paper. Fold
in half lengthwise (try to make all folds as exact as
possible), then open back out.
|
|
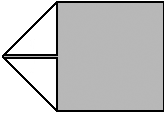
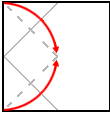
2. Fold the usual triangles.
|
|
|
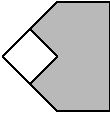
3. Fold over to the right.
|
|
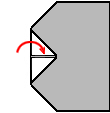
4. Flip over, fold the triangles again.
|
|
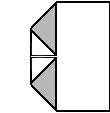
5. Fold over to the right again. 6. Flip over.
|
|
|
7. OK, this part is a bit tricky. Tuck your index finger
(finger #2) under the black dot as far as you can. Keeping
your finger there, push with your thumb along the red arrow.
You should see the nose (or "tooth") start to come out along
the blue arrow. Make a fold along the dotted line, to make
it look like picture 8. Repeat the same for the other
"tooth". |
|
|
8. This is the top view. |
|
|
9. Fold along the black & red lines to get the final
result. The wingtips should be 1.5 cm (9/16 inch) wide and
the fold should be parallel to the edge. Angle the red lines
slightly outwards at the tail (about 3 degrees), and the
plane will tend to fly upwards. If you do it correctly, you
won't need to bother with ailerons, flaps, etc. To make it
turn, just lean the body one way or the other. Have
fun! |
|
|
|
