 Go Back
 |
|
Inserting lines || Make a table || Rows, columns and borders || Spacing and Padding || Size and Colour of Tables || Changing cells || Checking how it looks || Putting in text || Inserting images
|
Go Back |
|
You may want to put a bar or a line right across the page.
To do this, put the cursor where you want the line, and press the horizontal rule button shown below.

............................................
If you want to put text beside a picture, instead of above it or below it, you will need to make a table. Start by putting the cursor on the page where you want the table to go, then clicking the table button shown below.

This will make a table like the one below, and show you the table window to set up.
3. Setting rows, columns and borders
In the table window (you get back to this any time by double clicking on the table edge) you can set up your options. Rows is the number of boxes down the table, and columns is the number of boxes across the table. Change these to any number you want.
Then you can decide whether to have a border or not. If you don't want the table to show, put a zero in the box next to Border. If you put in a bigger number, like 5, the border will be much thicker.
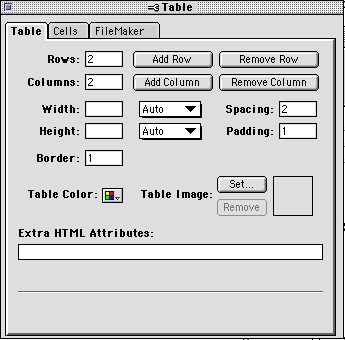
If you change the spacing numbers, it will also change the border width. Experiment and see what effect you want.
If you change the padding, it gives you a bit more space around text or images in the cells (they don't touch the edges). Mostly you can leave these numbers as they are.
5. Changing the size and colour of tables
In the same window, you can set the size of the table in pixels (if you know how many pixels you need), or in percents. If you leave this empty, it will show in the browser as big as the objects in that table. (This is the auto setting).
If you want the table to be a different colour from the page, you can set a colour with the Table Color button.
6. Changing cells in the table
Each box in the table is called a cell. You can open a window just for that cell by double clicking in it (you will get a thick blue line round the cell).
In that cell you can set colour, and alignment - and it will only affect that one cell. You can also set how wide you want the cell (in pixels or as a percent - best to use percent), and how high you want it. If you are setting a group of cells across a table, make sure your percentages add up to 100! If you leave the contents of Width and Height blank, the cell will be as big as the image or the text inside it.
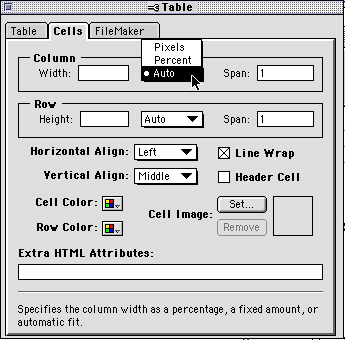
You can squeeze or stretch cells by pulling lines in or out with the mouse, but these may not look the way you want in a browser.
You cannot tell what a table will look like until you check it in a browser. The Preview button will not give you a good enough idea of what it will really look like.
Click on the browser button, and select Netscape to open up the page in that browser (because it is the one we use on our intranet.)

When you see any problems, close that window to get back to the HomePage version, and fix them up. You must do this with every page.
You put text in the table by just clicking the cursor in the cell you want, and typing.
If you want to change font type or size for every cell in a table, select the table by clicking once on the edge. You must make sure you have a thin blue line round the whole table - if there is a thick blue line round one cell, you have only selected that cell, not the whole table. Then change the font to the one you want, or change the size.
You insert pictures by clicking into the cell you choose, and using the Insert button.

Use the alignment controls in the cell window to move the image up, down, or across. You can also use the alignment tools you use for text, in the bar above.