 Go Back
 |
|
Inserting images || Borders || Aligning images || Transparent backgrounds || Move image || Resizing || Copyright issues
Before you start work, make sure all your images are inside your site folder, in the folder called images. If you suddenly want to use another image, put it in that folder before you insert it into your page!
First of all, put the cursor on the page, where you want the image to go. Then click on the Insert Image button, and navigate to find the image you want. Press Open, and it will be inserted.

If you want a border around the image, you must double click on the image once it is on the web page. This will bring up a window, so you can put in a border of one or two pixels around the image.
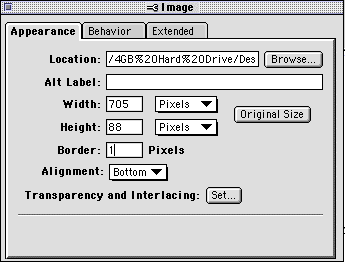
The border will be the same colour as the text.
In the same window, you can align the image to be at the bottom, top, middle, left or right of text it is next to, or the cell of a table it is in. Just click and hold Alignment, and slide up and down to make your choice.
4. Making transparent backgrounds
If your image is a GIF (it must be GIF, not JPEG) and it has a single-coloured background, you can make it transparent, so the background shows through.
Do this by double clicking on the image, and then at the bottom of the image window, click on Set nest to Transparency and Interlacing. This will bring up the following window. Click in the middle of the background section, and it will make it disappear. (It will only work if the background is one single colour.) Close the window, and save the change.
You can remove the transparency by clicking the second button on screen, with the red circle.
5. Move the image to where you want
You can drag the picture around the page, and also use the alignment tools to place it where you want.

If you can't put it exactly where you want (for instance beside a section of text), you will need to look at the next section on making tables. Most images on web pages are placed inside invisible tables, so they can be put exactly where you want.
You can resize the image by dragging it from one corner. But be careful - you can make it look pretty silly! To keep it in proportion, hold your finger on the shift button while you drag in and up from an outside corner.
Really, you should make the image the size you want before you begin. Use a programme like Photoshop or ExifViewer to resize your image. Remember that the bigger your file is (the more k it takes up), the slower the page will be to load in a browser.
You can use your own photos from the digital camera, or your own art work (in KidPix or Dabbler) as freely as you like. But you must be careful about using other people's photos or art work.
If there are any images in your site that are not yours, you must acknowledge them (by saying where they came from) in your bibliography.
If it is from our school intranet, you should put the URL of the page you copied it from.
If it is from the internet you should again put the URL, and you should also email the webmaster of that site to ask permission to use it in your site. (See Miss Currie about how to do this, and what to say in your email).
If it is from a book, you should give the title, the author and the publisher.
Remember - if it isn't yours, you can't just take it without asking! That is stealing someone else's work, and pretending it is yours.