Go
Back Go
Back |
|
Explaining the tools || Framing work || Line options || Fill options || Circles, squares, and straight lines || Triangles and Polygons
|
Go
Back |
|
1. Explaining the tools in the toolbox
To access these tools, the first thing you should do is to open the red toolbox at the bottom left of your page.
This will give you a tool bar down the left of the page, with tools to use. Here is the brief explanation of what the different icons mean.
At the top are the five main tools - text
(the blue A), spreadsheet (the numbers), paint (the palette
with colours), tables (the green boxes) and draw (the grey
arrow) below the other four. Below that we have a straight line and
then a box. The next line has curved corner boxes,
and ovals. The next line has curves, and then
straight edged shapes. The next line is freehand lines, and
freehand shapes with curves. The last line has polygons, and the
eyedropper (to suck up fill colours). Dotted line - - - - - - - - - - - - - - -
- - - - - - - Then you have the paint tools, which are
greyed out, and can only be used when you are in paint mode.
Dotted line - - - - - - - - - - - - - - -
- - - - - - - The next two tools are for when you are
working with tables - the left hand blue cross allows you to
edit tables, and the right hand one to cut or split cells in
a table. Dotted line - - - - - - - - - - - - - - -
- - - - - - - Below here are the line and fill tools,
which allows you to choose options for the line drawn by any
of the tools above. The top box on the left is the fill
button (fills any shape with colour or pattern) The middle box is the pen formatting
button (lets you choose colour, pattern and thickness of
lines) The lowest button (the T) is for changing
text colour. Down the right are the different choices
for colour, pattern and line that you can select from when
using one of these three tools.

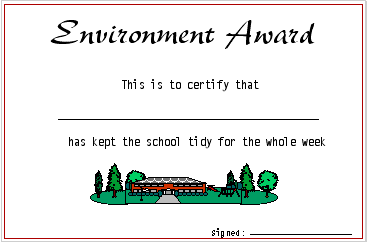
2. Putting a frame around your work
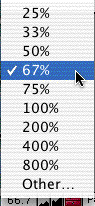
Sometimes you want to put a frame around your work. For instance, a certificate looks better if it is framed with a simple box. To do this, open the toolbox, and select the rectangle. It is easiest to reduce the certificate to 66% (in the bottom left corner of the window, so you can see the whole page at once.
 ........
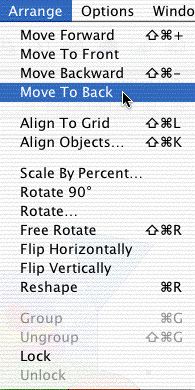
Then you select the line size you want, and draw a box around the outside of the certificate. You will find that it covers all the writing, but that is easy to fix. While it is still selected (has handles), go Arrange - Move to back. This will make it look like the example below.
3. Using the different line options
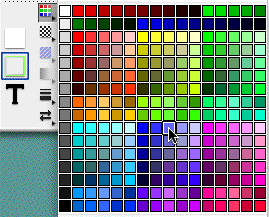
To change the colour of lines, or the shape of them, use the centre box at the bottom left of the toolbar. First press that box (you can see it outlined in blue in the examples below), and then choose to change the colour, or the pattern, or the thickness, or whether it has arrows.
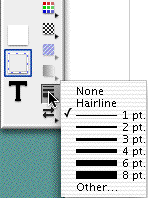
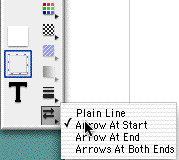
To draw a line with the properties you choose, you first click on the line tool, and then on any properties you want to change. Now any line you draw will have those properties. If you want to draw a square, click on the box tool, and then change the properties.
If you have already drawn something, and you want to change line properties, click on it to select it (giving it handles), and then alter the properties.
4. Using the different fill options
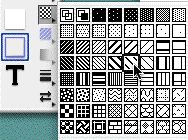
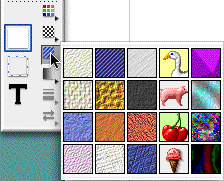
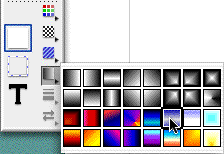
Above the line or pen formatting box is the box that formats fills - these choices affect what is inside any shape that is drawn such as a square, circle or polygon. If you want to colour in a shape, click on the shape tool, and then on one of the options to the right. You can see the choice currently chosen in the small box to the right of the paintpot icon. As well as choosing colour or pattern, you can choose wallpaper or gradient fills, like those shown below.
 .............................
If you have already drawn something, and you want to change what it is filled with, click on it to select it (giving it four handles), and then alter the properties.
It is important to look at the pattern options carefully (the second example above). The choice that looks like two hollow boxes makes any shape you draw transparent (ie you can see through it). The choice that looks like a black box overlapping a white box makes the shape solid, so that it is filled in.
5. Drawing a straight line, a perfect square, or a perfect circle
The shift key is a useful tool when using the toolbox. If you hold it down while you are using any particular tool, it makes the tool regular.
Shift and a line makes the line perfectly straight. Shift and an oval makes a perfect circle. Shift and a box makes a perfect square.
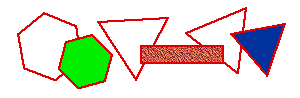
6. Drawing triangles and other polygons
You can change the number of sides the polygon tool draws. Do this by selecting the polygon tool, and then going Edit - Polygon Sides... Enter how many sides you want your polygon to have. (Three is the smallest number you can use - think about it!)
 ........................