 Go
Back Go
Back |
|
Why tables? || Rows & columns || Lines || Spacing lines || Changing cells || Adding text || Aligning text || Adding images || Finishing touches
|
Go
Back |
|
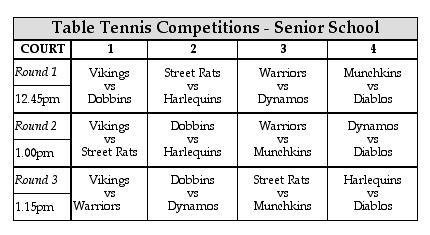
It is a good idea to learn how to use tables if you use the computer for organising information. It is easier and neater to use a table than to draw lots of separate lines or boxes to hold your information in. Here is an example of a table that you might choose to make.
2. Choose number of rows and columns
First click on the table tool in the toolbar (you may have to open the red toolbox first). This is the tool at the top which has a green table on it.
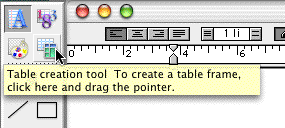
Now your cursor will look like this: ![]()
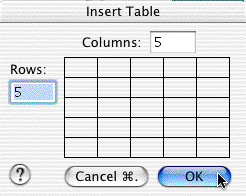
Drag out and draw a dotted square of any size, and you will see this window, where you can enter the number of columns you want across your table, and the number of rows you want down.
Now your table will appear on the page, ready for entering data.

3. How to make changes to the lines
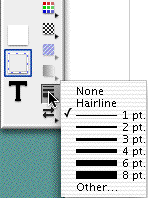
Sometimes you may want to make one of the lines in the table thicker or a different colour. Click on the line, until it looks like marching ants, and the cursor looks like it does below. Now you can go to the line thickness part at the bottom of the toolbar, and choose how wide you want the line to be.

You can also drag the line along and put it where you want it.
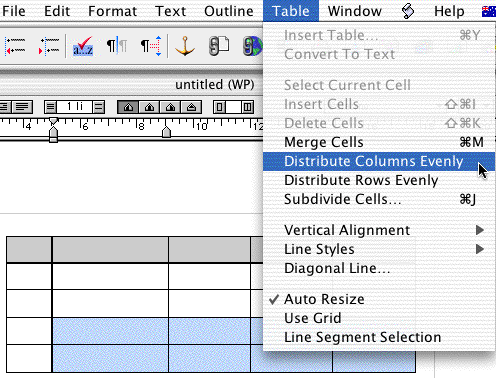
After dragging the lines around, you may find that they don't look even enough. What you need to do is drag the cursor through the cells you want to be the same size, and go Table - Distribute Columns evenly (or it may be the rows you want to fix up).
5. Changing cells - colour and width (merging and cutting cells)
If you want to colour some of the cells (a very light grey is the best if you are printing your table out) drag the cursor over to highlight the cells, and choose a colour or a pattern from the bottom of the toolbar.
Sometimes you may want to have one very wide cell across the top of other cells - you can do this by highlighting the cells you want to change, and going Table - Merge Cells. This will get rid of the lines between the cells you selected.
At other times, you may want more lines between those you already have - so first select the cells, then go Table - Subdivide Cells. This will ask you how many lines you want to have instead of the number you have now. Doubling the number will give an extra line in each cell.
Text is entered simply by clicking in the cell of the table where you want to type, and typing. Your cell will grow to the size needed to hold the text you put in it. Remember you can highlight text or the cell and change font, size, bold or italic.
When you have typed data into a cell, it will often look wrong squashed up to the top left. You can change it to be in the middle of the cell (from left to right) by using the centre alignment button at the top of the page (below the green button).

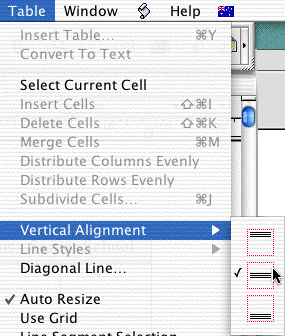
If you want to centre the writing in the cell from top to bottom, you need to go Table - Vertical Alignment, and then choose the middle box.
It is possible to put images into your table, by clicking in the cell, and then dragging an image and dropping it over the top. If, when you click on it, it has one handle and a dotted line around it, it will behave like text (for aligning and centering). If it has four or six handles, it will behave as a separate item not attached to the table.

9. Putting the finishing touches to your table
When you have finished, your table will probably need the command Table - Distribute Columns (or Rows) evenly applied to parts of it. This will make sure everything is lined up evenly.
You can drag it out bigger, or squeeze it smaller.
You can select groups of cells (or the entire table) and change the text size, colour, font or styling.
If you click on the Draw arrow, and then the table, you can alter the thickness or colour of the line around the outside of the table.
If you want to change all the lines, click on one until you get marching ants, and then use the keyboard shortcut Apple - A to choose all the lines - then you can change them how you wish.